campbellcameras
Don't miss

Monday, July 15, 2013

Filming Your Own Hunts- What to look for and what to buy


Filming Your Own Hunts

What to Look for and What to Buy


With the rise of things like Youtube and Vimeo, thousands of people have started filming, producing, and uploading their hunting videos to the Internet for others to see. This has inspired thousands more to get on board and start filming and sharing their hunts as well. Common questions I often get from newcomers to the world of videoing hunts typically sound as follows. What kind of equipment do I need? What do I look for in a video camera? How do I get started filming my hunts? And so on. This article seeks to answer a few of those types of questions. However, I will start by saying that the various options and types of equipment that can be used to capture a hunt on video is ever growing and changing. Since this is a short, introductory article, I will just focus on the main types of equipment that have been most commonly used in the past and are still used by the majority of people in the present. 

First of all, I think everybody knows you should buy a camera that can record in full HD 1080p as opposed to one that just records in standard definition. However, one of the most important aspects to look for in a camera that most newcomers to the world of videography are not familiar with is the sensor size. Sensor size is generally indicated in fractions of an inch. My personal preference would be to use a camera that has at least one third of an inch sensor size, usually written as 1/3 in the specifications section for the video camera. In my opinion, the sensor size is so important that I would rather have a larger sensor with less optical zooming abilities (such as 1/3 sensor with 10X optical zoom), than a small sensor with larger levels of optical zoom (such as 1/5 sensor with 50X optical zoom). Why, you may ask? The reason is because a larger sensor will provide a better picture, especially in low light situations. This is a crucial point for us as hunters, because many of our peak opportunities for a trophy animal will occur in early morning and late evening. 

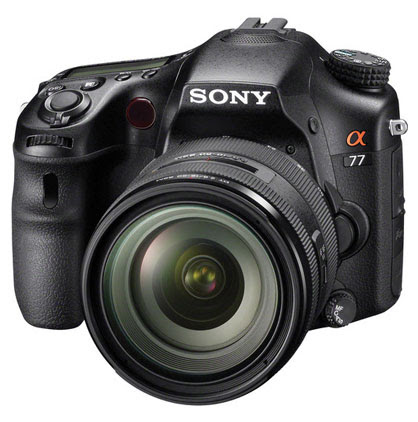
Since I am talking about the sensor, I want to address people who aspire to have their own hunting show on television. In general, most television networks want at least 70% of your footage to be filmed with a camera that has at least three sensors in it. This means that consumer rated camcorders will not suffice. A great entry level camera for those aspiring to TV production quality would be something like
the Sony HXR-NX5U or Sony HDR-AX2000 (pictured here). These cameras also have manual zoom, manual focus, and a manual iris ring, which can really assist in the professional look of your video footage. However, please know that it can take some work and practice getting used to these manual features. Therefore, I strongly recommend getting a camera like this well in advance before the hunting season so that you can spend time practicing and getting used to the manual features. You don’t want to spend all that money on a camera and then still have poor video production because the animal was not in focus at the time of the shot.

Campbell Cameras has package deals that provide all of the accessories you will need with these Sony type cameras, such as a shotgun mic, long-lasting battery, SD card, tree arm, UV filter, backpack to carry all of your equipment in, etc. A package like the one I am referring to typically includes a couple of my personal favorite accessories such as the MUDDY camera arm and Manfrotto fluid head (pictured below). The combination of these two accessories provides incredible stability and smooth panning for a high quality looking video.


Now that I have addressed what you may want to use if you aspire to produce television network
quality video, allow me to address individuals who just want to film their hunts for Youtube or friends and family. One of the most important features to look for in a camera is that it will accept an external remote such as the one pictured here. With a remote, your hand never leaves the handle of the panning arm and you can zoom in and out nice and smoothly without creating any unnecessary shaky footage. This single feature is far more helpful and important than most newcomers to the industry realize, especially for those who plan to film themselves like I do. Take it from me, if you are filming yourself and don’t have a remote, you constantly have to reach up to zoom and then reach back down to pan the camera. This causes a tremendous amount of shaking and choppiness in your footage. Even if you are filming someone else, you are still more likely to cause shaky footage if you are zooming with one hand and panning with the other, so please don’t overlook the helpfulness of having a remote!

When it comes to a top brand like Canon, the least expensive model that is currently available in their consumer grade lineup that is able to have an external remote plugged into it is the Canon Vixia HF G20 (pictured here). In my opinion, this is a pretty sweet camera! It also does well in low light compared to some other brands because of its 1/3 inch sensor. 


The last thing I would suggest adding to your arsenal of video equipment is at least one POV camera. POV stands for Point of View. They generally do not zoom in or out, and they typically capture footage in a wide angle view. The key things to look for in a POV camera are that it can record in HD 1080p, has image stabilization, descent low light image quality, good record time, rechargeable battery(s), wireless remote control to start and stop recordings, and a monitor or blue tooth connectivity which enables you to connect it with your smart phone. This last feature is especially helpful so that you can see what you are videoing if the camera is mounted on your hat or at a distance in a tree near you. 

Some nice things about POV cameras are that they are light, compact, and provide additional camera
angles. Whether you are by yourself or hunting in a team, you can easily set up a POV camera on the tree next to you in order to video yourself make the shot. This enables the viewer to see you in action, which a lot of people like. In fact, with products such as the GoPro Hero 3 (pictured here), you can set up a bunch of POV cameras all around you and turn all of them on at the same time with one single remote. In the past, you had to move all around trying get all of your cameras turned on as the animal approached. This created a tremendous amount of motion, and you risked scaring away the game animal.

At any rate, I sincerely hope that this short, introductory article has helped to give you a few ideas regarding what to look for and what to buy as you get started filming hunts. If you have any more technical questions, I’ll refer you to the staff at Campbell Cameras. They know what they are talking about and have always been extremely helpful with the people I know who have called or emailed them with questions. Lastly, I wish you the best of luck as you get out there and start filming your own hunts! I hope you will even start filming this year, so that you can watch, share, and “Relive Your Adventure” for many years to come! May God bless you throughout the journey!


Thursday, July 11, 2013

Introducing the Ghost- DSLR/ Video Camera Stabilizer


Introducing the Ghost- DSLR/ Video Camera Stabilizer
by Jesse Spaulding


The Ghost is a Robotic Camera Stabilizer for DSLR's, micro 4/3rds, Blackmagic, and Small Video Cameras.
Stay connected and follow us on Facebook, or subscribe to our YouTube channel.
Camera stabilizing rigs have become more and more poplar as the video industry grows and people realize smooth video is essential for a professional product.
Steadicam rigs are one of the only products on the market that allow for these professional shots, but they are expensive and take years of operating to master. That is, until The Ghost. The Ghost is a robotic camera stabilizing rig programmed to stay level. This revolutionary camera rig couldn't make smooth filming any easier. It is very lightweight, durable, and so easy to use that even a child can operate it. It is primarily made out of carbon fiber to minimize weight and withstand the abuse of field use. The electronics are simple with two silent brushless motors and a pre-programmed control board. Just attach the battery, turn it on, and track your subject to get that cinematically smooth footage.


The Ghost requires only one operator. You also have the option to connect a receiver and transmitter for remote operation, or to include a second camera operator.
The Ghost supercedes old-fashined physics and eliminates human error from the equation. Let The Ghost do the work for you as it glides smoothly and effortlessly around. This allows the operator to be more creative in his or her shots.
A new revolution of robotic rigs has just materialized (so to speak).


The idea was developed from building a stable camera platform for my multi-rotored helicopter. I have been a professional aerial cinematographer for 3 years and I'm always striving to get the smoothest footage. I realized what I designed for use in the air, should also be applied to use on the ground. I put my steadicam in the closet and started using my aerial camera mount for filming on the ground. It was just easier and lighter. I am not physically built to be a steadicam operator, but because the Ghost is so light and designed for small and medium sized cameras, I can use it all day without becoming fatigued. You have the option to use two hands, so one arm won’t get too fatigued. Or, you can mount it to a steadicam vest and arm.
With the release of the new Blackmagic Pocket Cinema Camera, you don't need a huge, expensive camera and steadicam rig to film amazing shots. This is also the case with the new magic lantern firmware for the Canon 5D Mark III. Cameras are getting smaller and better, so The Ghost follows suit. It is designed to be your silent partner, shadowing your every intention and hardly being noticed.
The Ghost is Designed, Machined and Fabricated in our shop in Missoula, MT, USA


Despite The Ghost’s minimal dimensions, it supports cameras such as the Canon 5D Mark III, or Nikon D800. The system can support up to 3.5lbs. This is about equivalent to the Canon 5D Mark III with the 24-105mm Lens.

The Ghost Specifications

  • Weight: Approx. 39oz/ 1105 grams
  • Dimensions (W x H x D): Approx. 18 x 12.5 x 8 (450 x 320 x 200mm)
  • Startup time:Approx. 5 seconds
  • Runtime: Approx. 2.5 hours/battery

Carrying Capacity

  • Maximum Camera Dimensions (W x H x D)Approx. 7 x 8 x 8 in. (18 x 20 x 20 cm)
  • Camera Weight:  Up to 3.5lbs/ 1500

Battery Specs

  • Runtime: Approx. 2.5hrs
  • Weight: Approx. 5oz/ 141g
  • Dimensions (W x L x H)Approx. 2.5 x 4 x 1 in. (63 x 101 x 25mm)

Other

  • Materials:Carbon Fiber Construction
  • Adjustable Axis:Fully adjustable in all 3 axis to achieve perfect balance
  • Firmware: Open Source
  • Motors: Rewound Brushless Motors
  • 100% designed and assembled in the USA

A Summary of the Process

2011
  •  Construct 2-axis gimbal for mulirotored helicopter
2012
  • Added 3rd axis (geared with servo) to aerial gimbal
  • Designed and Conceptualized a brushless gimbal
2013
January
  • Manipulated aerial gimbal for ground steadicam use
  • Combined steadicam gimbal with electronic gimbal for first prototype
February
  • First Brushless Gimbal Prototype – mini gopro version
  • Tested different control boards and motors
March
  • Tested new, larger motors
  • Programed control board – tested new firmware and settings
  • Re-designed prototype for more adjustability
April
  • Tested new motors
  • First mini-ghost gimbal for up to 1 pound
  • Designed new gimbal parts for larger motors and larger camera
May
  • Constructed larger gimbal parts for SLR
  • Completed a fully functional prototype of “The Ghost” – up to 3.5lbs
  • Agreed upon naming the prototype "The Ghost”
June
  • Field Tested “The Ghost”
  • Re-did website including “The Ghost” and online store
  • Filmed/Edited Kickstarter Video
  • Designed Kickstarter
July
  • Launch Kickstarter
  • Continue Field Testing The Ghost
  • Develop 3rd Axis


First Complete Prototype of The Ghost


I designed a simple, stable platform to keep production costs down and make The Ghost affordable. It only has two axis of programmed stabilization, while the third axis is manual (smooth bearing). We will soon offer a 3rd axis of stabilization in an upgrade kit with more programmable features.


Our goal is to ship the kits before Christmas and the pre-assembled Ghosts in January. Assembling the Ghost takes some time, and we will send them off as soon as they are complete. If we finish the assembly early there’s a chance you could get The Ghost before Christmas!
The Ghosts will be shipped in the order pleadges are received.

Extras:

We include a 4000mah battery with built in on/off switch and charger. But, if you would like an extra battery, please include an additional $60 in your pledge.

Purchase the cheese plate to mount any extras to The Ghost like a monitor, microphone, light, etc.

Coming Soon:

The pan axis currently operates manually with a ball bearing joint, however, a robotic 3rd axis will come soon. Some people may prefer a manual pan axis, so the robotic 3rd axis will be released as an extra in the near future. The robotic 3rd axis will allow for remote control pan movements and eliminate any unwanted sway.


The Ghost does not need a steadicam arm and vest, but we want to accommodate for those who want the option. With the adapter, The Ghost is easily mounted to a steadicam arm and vest to achieve the smoothest video and take the weight off of your arms.

Risks and challengesLearn about accountability on Kickstarter

I currently run a small production company and need YOUR help to mass produce the Ghost and keep the costs low for everyone. We have the suppliers lined up, but we need to place a bulk order. Everything will be made and assembled here in Missoula, Montana. We want this product made in the USA at an affordable cost, but we need your help to kickstart this project.
Be among the first to own and operate the Ghost. We'll use your generous pledges to place our first order with our suppliers and begin manufacturing. By donating to this kickstarter you will receive our products before anyone else and below retail value. We want to reward you for helping the project succeed.

Monday, July 8, 2013

Keys to Using a DSLR (the basics) - Featuring the Sony Alpha a77


Keys to Using a DSLR (the basics) - Featuring the Sony Alpha A77
by Rock Road Pursuits

DSLRʼs have revolutionized the professional video production industry since their introduction just a few years back. They have become an essential and vital tool for almost every type of production. DSLRʼs have opened up new doors to affordability, flexibility, and most importantly the potential to create. In this article we will be breaking down how to operate a DSLR, how to choose what to buy and how you can take your creativity to new levels.

So what is a DSLR and why do you need one?
Filming with a DSLR definitely is a joy when used correctly. Using a DSLR allows great flexibility and creativity across a broad range of needs. DSLRʼs have three fairly simple exposure adjustments that can be changed to account for different lighting and situations. Those adjustments are the ISO, Shutter Speed, and the Aperture. The ISO and Shutter speed are both changes that take place inside the hardware of the camera while the aperture is relative to the lens you are using.

Manual Settings:
The ISO is how light sensitive the sensor inside the camera is. For example in
broad daylight ISO 100 would be a great choice, while at dusk ISO 640 might be
better. When looking at footage that is noisy the ISO is typically the culprit. We try
to adjust the ISO as a last step of adjustment, in most daylight cases we put it at
ISO 320 and leave it.


The shutter speed is how long the camera exposes each image. It is important
to note that the shutter speed is very different from frame rate, and frames per
second. Frame rate is relative to the videos you shoot , for example 24p, 30p, or
60p are fairly standard. Frames per second relate to how fast your DSLR can
take photos. This can range anywhere from 3-15 depending on your camera.
Your shutter speed can be set on most cameras anywhere from 30 seconds for
one photo, all the way to 1/8000 of a second. A 20-30 second exposure is great
for shooting at night such as shooting a star lapse, this will allow you to grab
more light. While 1/8000 will freeze the motion of most all fast moving objects
such as a bird flying. Adjusting the shutter speed is what we do to fine tune
exposure settings, of the three main manual settings itʼs the one we change most
often.


Aperture is another adjustment that is commonly confused and misunderstood.
Every lens has two sets of important numbers to consider when buying. The first
is the focal length, for example the Sony A77 is sometimes sold with a 16-50mm
F2.8 lens. 16mm will give you a much wider field of view than 50mm. The second
number is the F-stop or Maximum Aperture. For example a 16-50mm F2.8 is
telling you that the maximum aperture is F2.8.
Aperture is by far the most important of these three settings. A lens with a fast f
stop of F1.8 will let nearly four times more light in than a lens with an F-stop of
F5.6. This is similar to how the human eye works. When your eye needs more
light your iris (or aperture) opens wider, allowing more light into your eye or
camera. F1.8 is actually a larger opening that F5.6. Using a faster lens is crucial
for filming indoors or at dawn and dusk. It allows you to grab more light by
adjusting the F-stop rather than having to crank the ISO up.


The Sony Alpha A77:
There are hundreds of DSLRʼs on the market today, so figuring out which is right
for you is possibly the hardest part of the process. The Sony A77 brings a lot to
the table for a fraction of what some other DSLRʼs cost. It features continuous
shooting of 12 frames per second. This means if you hold down the shutter
button the camera will take 12 pictures per second of 24.3 Megapixel RAW
photos...very impressive. Another cool feature of the Sony A77 is the OLED EVF.
This means when you look through the viewfinder to take a photo you are looking
at an LED screen opposed to a piece of glass like in most Canon and Nikon
DSLR'S. The screen is extremely bright and accurate.
The feature that stands out most on this camera is the Vari-Angle LCD. This
allows you to position the LCD screen almost anywhere you want when filming.
This comes in handy in the field when you are in an awkward position and need
to adjust the LCD screen to see it clearly to get the shot!

Getting Great Results using Great Gear:
A DSLR is only as good as the person using it. The difference between great
DSLR footage and footage that is useless comes down to a few simple, but very
crucial things. Make sure you can run your DSLR efficiently and adjust settings
on the fly. Adjusting exposure for various lighting conditions is important
especially as lighting conditions change throughout the day. Becoming familiar with your camera is something that will take time, patience and an enormous amount of practice.

The next step is being sure that you have the right gear to compliment your
DSLR. A good tripod is crucial in order to capture great footage. We have had excellent luck with our Manfrotto fluid heads. The Manfrotto 500AH fluid head and Campbell Cameras 525 Hunter Tripod legs is a great basic
setup that will run you about $180.

The next thing to consider is upgrading from your kit lens (the lens included with the camera). Buying a fast lens is a natural next step, a lens similar to a 50mm f1.8 is a great addition to any photographerʼs gear. This type of lens is a must for low light conditions at dawn and dusk. Another great lens to have in your bag is a telephoto lens. We use a Canon 100-400mm to accomplish this but any lens over 200mm will give you great results filming wildlife at a distance. There are many lens options out there and we suggest to do your homework on all options before making the purchase. Campbellcameras.com is a great place to browse through lens choices and decide what lens works best for you.

Microphones also make a big difference with DSLR filming. Great footage is lost without great audio to go with it. We use the Rode Stereo Videomic Pro, Rode makes great microphones for DSLRʼs starting at $100. Investing in a good audio solution is crucial to obtaining the results you desire.

Conclusion:
There are dozens of other uses for DSLRʼs. Advanced subjects like time-lapses,editing, framing, slow motion, slider shots and many more can be found by looking for tutorials on www.campbellcamerasprostaff.com. Owning a DSLR opens a whole new world of possibilities as a outdoor videographer and forces a person to put their creative abilities to the test. Buying the gear is the easy part, the tough part is taking time to learn your equipment inside and out, learn to take constructive criticism from your peers and most importantly practice...practice...practice. Film what you love to do and share it with the world!

Password: 1234

Wednesday, July 3, 2013

2013 Turkey Season for Buckhorn Outdoors


Tuesday, July 2, 2013

Checkmate [Video]


Deer Antler Velvet – What is is and How it's used


Deer Antler Velvet – What it is and How it's used


Photo by: Trent Busenbark
What is the Velvet on a Deer Antler?
As most of you know,  deer, elk and moose produce new antlers yearly. The velvet stage of the growth is considered the precalcified stage where it is essentially a growth hormone called "insulin-like growth factor 1," or IGF-1.

How it is used:
IGF-1 has shown promise for helping kids with stunted growth or people with dwarfism, as well as for healing cartilage or tendon injuries. It should not be used without a doctor's care, especially as a performance enhancer.

Early research shows that IGF-1 may be effective in healing some cartilage and tendon injuries, noted Leon Popovitz, an orthopedic surgeon and founder of New York Bone & Joint in Manhattan.

A recent study found that taking IGF-1 supplements is linked to improving cartilage damage in joints due to repetitive trauma, Popovitz said.

Even so, such studies are still very preliminary, and growth hormone research is still unproven, he cautioned. At the moment, deer antler velvet is available as an unregulated supplement.


"What often happens is these supplement companies grab these promising [hormone] factors, jump on them, and market them before the entire medical community has the ability to know the real detrimental effects," Popovitz said.

According to Alison Davidson in her book Velvet Antler, the stags are not harmed or killed for the velvet antler. In some countries, such as Australia and New Zealand, deer are subject to local anesthesia and restrained during antler removal, and the procedure is supervised by licensed veterinarians. Typically, the antler is cut off near the base after it is about two-thirds of its potential full size, between 55 to 65 days of growth, before any significant calcification occurs. The procedure is generally done around June in the Northern Hemisphere and December in the Southern Hemisphere.

Performance Enhancers
Velvet Antler IFG-1 has been linked to many athletes who use the drug as a performance enhancer. Many athletes choose to abuse the dosage and can result in adverse effects and may cause tendons to become too tight and break or may disrupt how the body metabolizes fats and sugars.

Bottom Line
For now, until the medical environment can safely identify all the benefits as well as the side effects, we should let the deer, moose and elk stick with the use of Velvet.