Keys to Using a DSLR (the basics) - Featuring the Sony Alpha A77
by Rock Road Pursuits
DSLRʼs have revolutionized the professional video production industry since their introduction just a few years back. They have become an essential and vital tool for almost every type of production. DSLRʼs have opened up new doors to affordability, flexibility, and most importantly the potential to create. In this article we will be breaking down how to operate a DSLR, how to choose what to buy and how you can take your creativity to new levels.
So what is a DSLR and why do you need one?
Filming with a DSLR definitely is a joy when used correctly. Using a DSLR allows great flexibility and creativity across a broad range of needs. DSLRʼs have three fairly simple exposure adjustments that can be changed to account for different lighting and situations. Those adjustments are the ISO, Shutter Speed, and the Aperture. The ISO and Shutter speed are both changes that take place inside the hardware of the camera while the aperture is relative to the lens you are using.
Manual Settings:
The ISO is how light sensitive the sensor inside the camera is. For example in
broad daylight ISO 100 would be a great choice, while at dusk ISO 640 might be
better. When looking at footage that is noisy the ISO is typically the culprit. We try
to adjust the ISO as a last step of adjustment, in most daylight cases we put it at
ISO 320 and leave it.
The
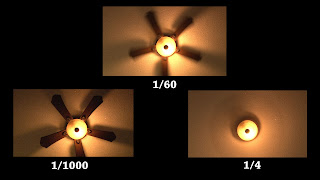
shutter speed is how long the camera exposes each image. It is important
to note that the shutter speed is very different from frame rate, and frames per
second. Frame rate is relative to the videos you shoot , for example 24p, 30p, or
60p are fairly standard. Frames per second relate to how fast your DSLR can
take photos. This can range anywhere from 3-15 depending on your camera.
Your shutter speed can be set on most cameras anywhere from 30 seconds for
one photo, all the way to 1/8000 of a second. A 20-30 second exposure is great
for shooting at night such as shooting a star lapse, this will allow you to grab
more light. While 1/8000 will freeze the motion of most all fast moving objects
such as a bird flying. Adjusting the shutter speed is what we do to fine tune
exposure settings, of the three main manual settings itʼs the one we change most
often.
Aperture is another adjustment that is commonly confused and misunderstood.
Every lens has two sets of important numbers to consider when buying. The first
is the focal length, for example the
Sony A77 is sometimes sold with a 16-50mm
F2.8 lens. 16mm will give you a much wider field of view than 50mm. The second
number is the F-stop or Maximum Aperture. For example a 16-50mm F2.8 is
telling you that the maximum aperture is F2.8.
Aperture is by far the most important of these three settings. A lens with a fast f
stop of F1.8 will let nearly four times more light in than a lens with an F-stop of
F5.6. This is similar to how the human eye works. When your eye needs more
light your iris (or aperture) opens wider, allowing more light into your eye or
camera. F1.8 is actually a larger opening that F5.6. Using a faster lens is crucial
for filming indoors or at dawn and dusk. It allows you to grab more light by
adjusting the F-stop rather than having to crank the ISO up.
The Sony Alpha A77:
There are hundreds of DSLRʼs on the market today, so figuring out which is right
for you is possibly the hardest part of the process. The
Sony A77 brings a lot to
the table for a fraction of what some other DSLRʼs cost. It features continuous
shooting of 12 frames per second. This means if you hold down the shutter
button the camera will take 12 pictures per second of 24.3 Megapixel RAW
photos...very impressive. Another cool feature of the
Sony A77 is the OLED EVF.
This means when you look through the viewfinder to take a photo you are looking
at an LED screen opposed to a piece of glass like in most Canon and Nikon
DSLR'S. The screen is extremely bright and accurate.
The feature that stands out most on this camera is the Vari-Angle LCD. This
allows you to position the LCD screen almost anywhere you want when filming.
This comes in handy in the field when you are in an awkward position and need
to adjust the LCD screen to see it clearly to get the shot!
Getting Great Results using Great Gear:
A DSLR is only as good as the person using it. The difference between great
DSLR footage and footage that is useless comes down to a few simple, but very
crucial things. Make sure you can run your DSLR efficiently and adjust settings

on the fly. Adjusting exposure for various lighting conditions is important
especially as lighting conditions change throughout the day. Becoming familiar with your camera is something that will take time, patience and an enormous amount of practice.
The next step is being sure that you have the right gear to compliment your
DSLR. A good tripod is crucial in order to capture great footage. We have had excellent luck with our Manfrotto fluid heads. The
Manfrotto 500AH fluid head and
Campbell Cameras 525 Hunter Tripod legs is a great basic
setup that will run you about $180.

The next thing to consider is upgrading from your kit lens (the lens included with the camera). Buying a fast lens is a natural next step, a lens similar to a
50mm f1.8 is a great addition to any photographerʼs gear. This type of lens is a must for low light conditions at dawn and dusk. Another great lens to have in your bag is a telephoto lens. We use a
Canon 100-400mm to accomplish this but any lens over 200mm will give you great results filming wildlife at a distance. There are many lens options out there and we suggest to do your homework on all options before making the purchase.
Campbellcameras.com is a great place to browse through lens choices and decide what lens works best for you.
Microphones also make a big difference with DSLR filming. Great footage is lost without great audio to go with it. We use the
Rode Stereo Videomic Pro, Rode makes great microphones for DSLRʼs starting at $100. Investing in a good audio solution is crucial to obtaining the results you desire.
Conclusion:
There are dozens of other uses for DSLRʼs. Advanced subjects like time-lapses,editing, framing, slow motion, slider shots and many more can be found by looking for tutorials on
www.campbellcamerasprostaff.com. Owning a DSLR opens a whole new world of possibilities as a outdoor videographer and forces a person to put their creative abilities to the test. Buying the gear is the easy part, the tough part is taking time to learn your equipment inside and out, learn to take constructive criticism from your peers and most importantly practice...practice...practice. Film what you love to do and share it with the world!
Password: 1234


